

How To Create An Affinity Diagram
Maybe you are a process owner trying to find the limitations of your current system. Maybe you are a manager befuddled by an episode of professional finger pointing. Maybe you are the UX guy drowning in a pile of consumer research. No matter the situation, affinity diagramming will help you to organize your thoughts and overcome your most recent workplace challenge.
Already know that you want to use an affinity diagram? Get started with our free template!
What is an affinity diagram?
Formalized in the 1960s by Japanese anthropologist Jiro Kawakita, affinity diagrams can also be referred to as affinity charts, affinity maps, or the KJ method. Affinity diagrams are ideal for sorting large amounts of data or long lists of ideas into related groups. You can use affinity diagrams to:
- Organize the results of a brainstorming session.
- Improve processes.
- Mediate professional conflict.
- Develop innovative solutions.
- Drive group consensus.
The theory of affinity diagrams is to harness natural creativity by facilitating an environment where everyone has a voice, conflict is minimized, and gut reactions are favored over analysis. Read on to discover how this happens.
How to create an affinity diagram

Affinity mapping is simple. Most people use sticky notes, markers, and a big blank wall, but all you really need is Lucidchart. Here's how it works.
1. Open a new Lucidchart document and title it with your challenge. The challenge should be written in the form of a question. For example, "How can we improve time management at the office?" Share your document with all participants and grant them editing access.
2. Have participants record their ideas on virtual sticky notes underneath the title question. Multiple participants can edit the document in real-time without overriding another participant's changes. No ideas should be thrown out, and participants should not be limited to a certain number of ideas. This allows everyone to contribute ideas openly without fear of being shut down. Also, because you are using Lucidchart, you don't have to worry about running out of sticky notes.
3. Without speaking to each other, everyone moves the sticky notes so that similar items are grouped together. This should be done in silence so that participants don't bias each other and smother natural instincts. If one idea doesn't fit with any of the others, it's okay to leave it as a stand-alone. Also, if a participant doesn't agree with the placement of an idea, they should feel free to move it. If an idea keeps being moved back and forth between multiple groupings, create multiple sticky notes with the same idea and put one in each of the contested groupings. This minimizes conflict. You should allow plenty of time for the process to occur. Several days may be ideal.
4. When they finish grouping the sticky notes, gather all of the participants, and together, choose a label for each grouping that has emerged. You can use one idea from the grouping that best represents all of the other ideas or choose a new title. If several groups seem related to each other, you may want to create a superheader that combines the groups.
You now have a completed affinity diagram that will help you to analyze your data, draw conclusions, and determine next steps.
Affinity diagramming in Lucidchart rather than with sticky notes makes it possible for anyone to participate, even those who are separated by distance. Participants can add ideas or create groupings at any convenient time, whether they are at home or the office. Additionally, Lucidchart increases the level of anonymity in this process because co-workers aren't watching as a participant goes to a physical wall and adds or moves a sticky note.
A specific affinity diagram example
Let's practice with an example. Say your content writing team is not producing as much content as you think they should be. You can use an affinity diagram to uncover any problems and come up with solutions to resolve them.
To start, you create a Lucidchart document with the title "What are the glitches in our content creation process?" After sharing the document with all of the relevant stakeholders, you give them time to record ideas at their leisure. The result looks something like this:
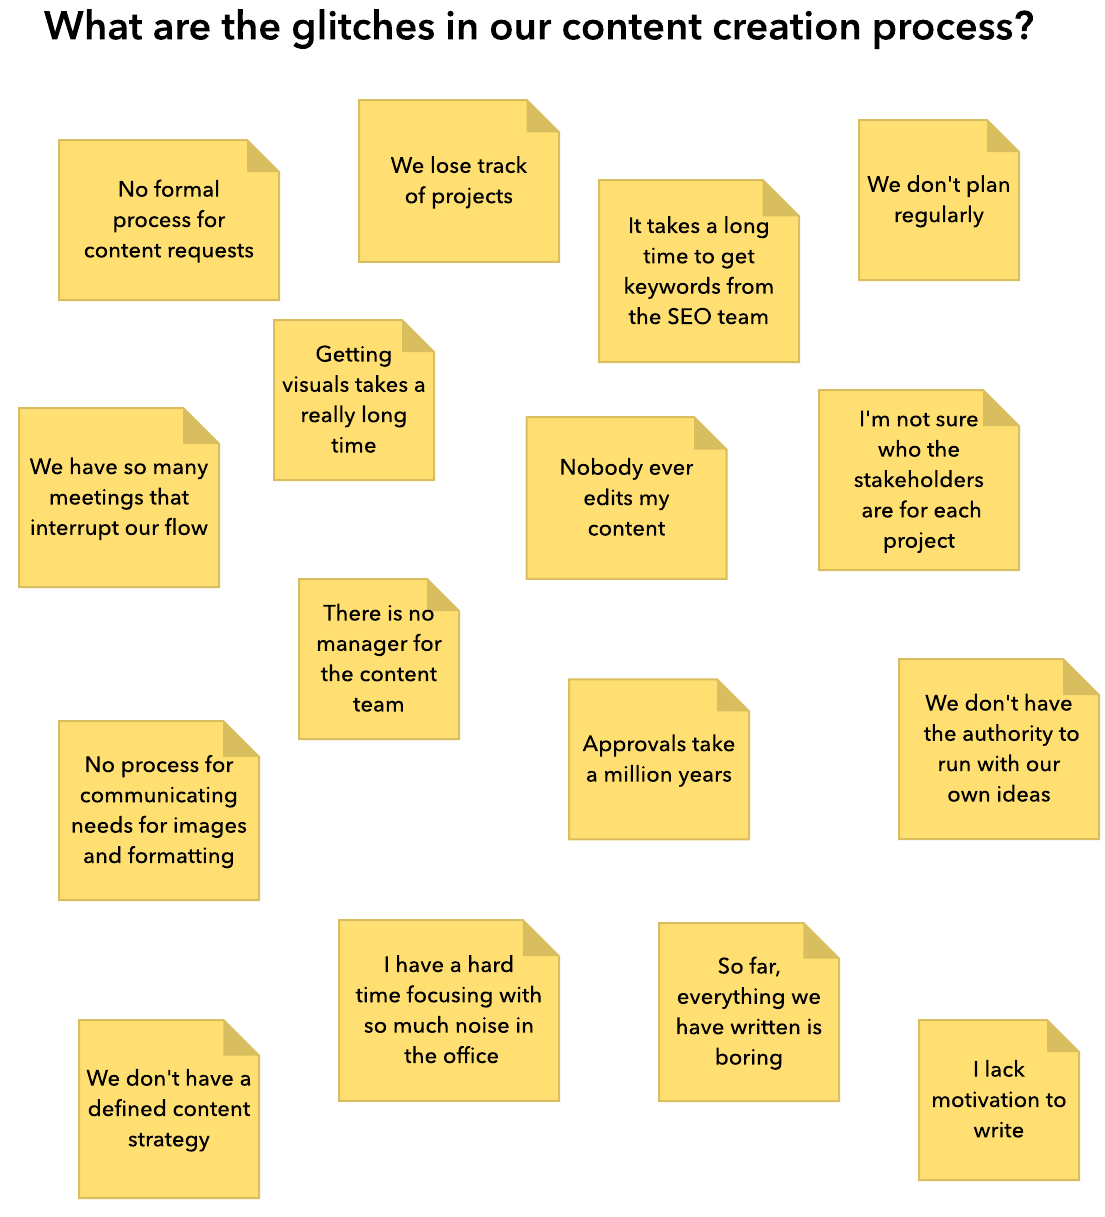
Now you ask everyone to organize their ideas into groups that are similar. Some of the sticky notes get moved back and forth, but after a few days, these are the results:

You schedule a meeting that all of the stakeholders attend, and you give titles to each of the groupings with more than one idea.
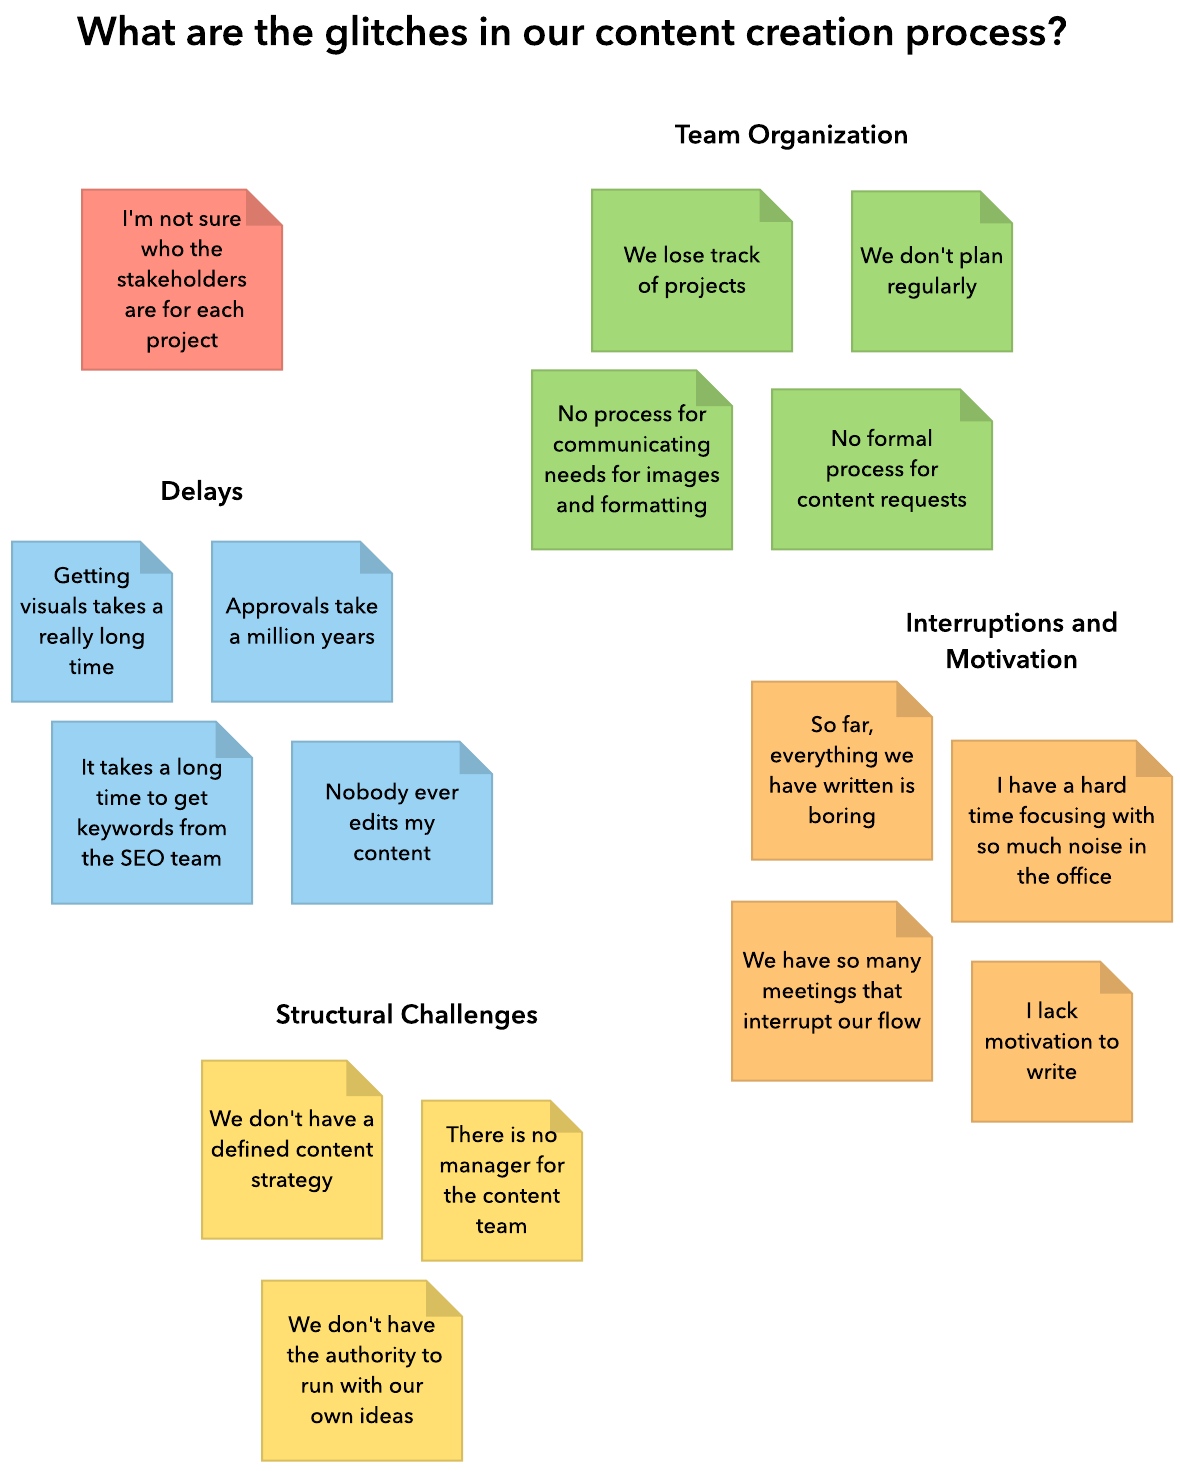
At this meeting, you also discuss ways to overcome these glitches. Because they are grouped into categories, it is easier to think about and determine root causes. Instead of solving 16 problems, you only need to solve five.
Affinity diagramming tips
Here are a few things to keep in mind as you make your first affinity diagram:
- Affinity mapping works best when you limit your participants to five or six.
- The process of ideation and grouping should be silent. Don't talk about it!
- If you have fewer than 15 data points, affinity diagramming may not be necessary.
- Don't overthink groupings. Go with your first instinct.
Affinity diagram template
Because affinity diagramming is an organic process, you don't want to restrict your team to a specific template. However, we have prepopulated this document with a title box and a few colorful sticky notes to get you started.
Click the image below to open this customizable template in Lucidchart.

How To Create An Affinity Diagram
Source: https://www.lucidchart.com/blog/affinity-diagrams-your-key-to-more-creative-problem-solving
Posted by: kingassfor.blogspot.com
0 Response to "How To Create An Affinity Diagram"
Post a Comment